


Creating your own IoT device is an exciting process that involves defining a clear problem, choosing the right microcontroller, writing firmware, and connecting it to a cloud network. By prototype testing on a breadboard, you can safely turn your smart ideas into working physical gadgets.
How to Create an Iot Device?
Imagine waking up to the smell of fresh coffee. Your alarm clock told the coffee maker to start brewing the exact moment you opened your eyes. This is the magic of the Internet of Things (IoT). Today, we live in a world where everyday objects talk to each other. These smart devices make our lives easier, safer, and much more fun.
You might look at these smart gadgets and think they are too complex to build. But that is not true. If you have ever wanted to bring your own smart idea to life, you are in the right place. Anyone with a bit of curiosity can learn how to create an IoT device. You do not need a degree in rocket science to get started.
In this guide, we will break down the entire process into simple, bite-sized steps. We will cover everything from choosing your first hardware board to writing code and connecting to the cloud. By the end of this article, you will have a clear roadmap to build your very own smart product. Let’s dive in!
Key Takeaways
- Start with a clear goal: Define the exact problem your device will solve before buying any hardware.
- Choose the right board: Use beginner-friendly microcontrollers like Arduino, Raspberry Pi, or ESP32.
- Master the connectivity: Select Wi-Fi, Bluetooth, or cellular based on your device’s power and range needs.
- Focus on security: Implement encryption and secure authentication from the very first line of code.
- Test and iterate: Build a simple breadboard prototype first before moving to custom printed circuit boards.
📑 Table of Contents
Phase 1: Define the Problem and Use Case
Before you buy any wires or chips, you need a plan. Every great smart gadget starts with a simple question: What problem does this solve? If you design without a clear goal, you might waste time and money on parts you do not need. This first step is all about defining your device’s purpose.
Finding Your “Why”
Start with a simple, real-world issue. Maybe your plants keep dying because you forget to water them. Or perhaps you want to know if your garage door is open when you are at work. These are perfect problems for an IoT device to solve. Keeping your goal simple makes it much easier to succeed. It also helps you stay motivated as you learn how to create an IoT device.
Setting Constraints and Requirements
Once you have an idea, think about how it will work in the real world. Will your device sit indoors near a power outlet? Or will it live outside in the rain, relying on a small battery? Answering these questions helps you set your constraints. Write down what your device must do, how big it can be, and how much power it can use. This will guide every decision you make next.
Phase 2: Choosing Your IoT Hardware
Now comes the fun part: picking your hardware. Think of hardware as the body and brain of your device. You need to choose components that can talk to each other and handle your tasks. If you want a deep dive into the planning stage, check out this comprehensive IoT product development guide to see how hardware fits into the bigger picture.
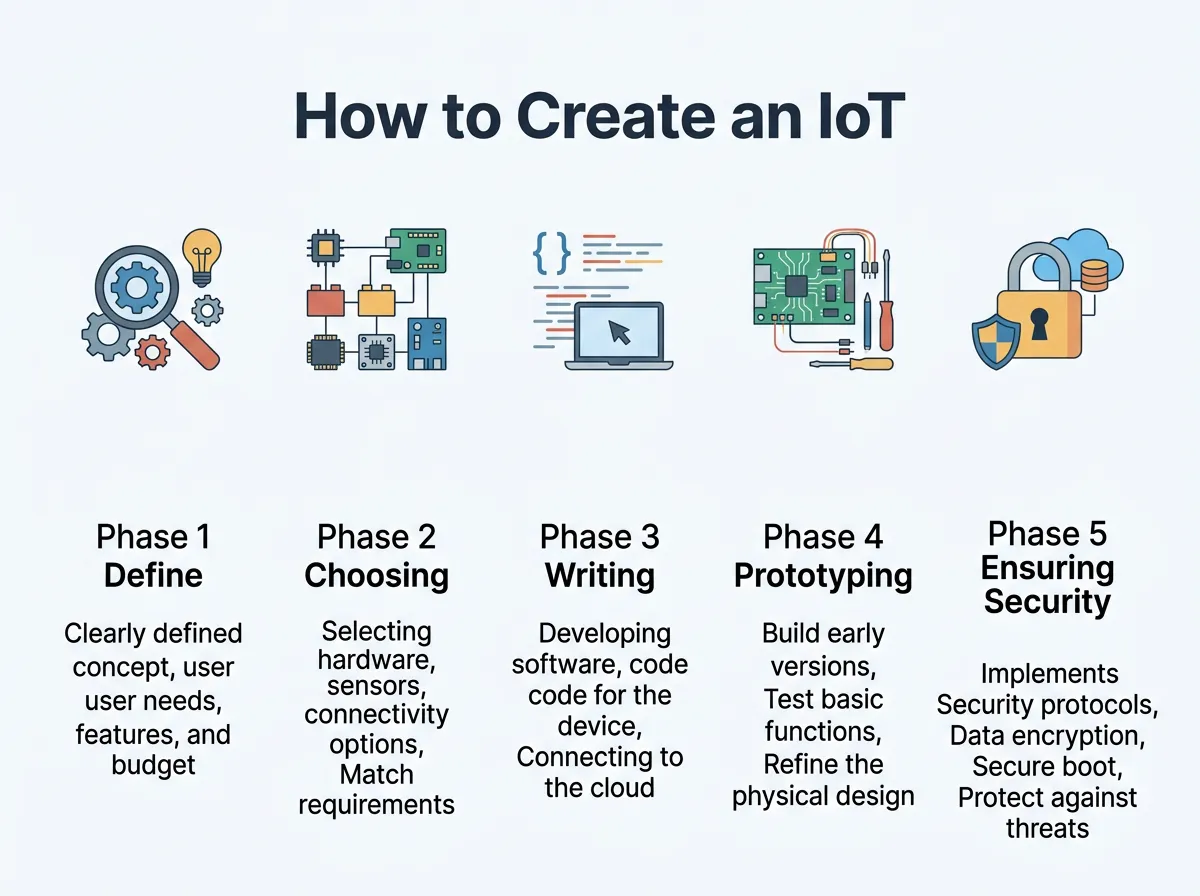
How to Create an IoT Device? — key points at a glance
Microcontrollers vs. Single-Board Computers
The brain of your project will usually be a microcontroller (MCU) or a single-board computer (SBC). For simple tasks, microcontrollers are perfect. They are cheap, use very little power, and start up instantly. Boards like the ESP32 or Arduino are great choices. If you need to do heavy tasks like video processing, you might need a single-board computer like a Raspberry Pi. For most beginner projects, a simple ESP32 board is the best place to start.
Sensors and Actuators
How does your device interact with the physical world? It uses sensors to “feel” and actuators to “act.” Sensors measure things like temperature, humidity, light, or motion. Actuators do things like spin motors, turn on lights, or open valves. Make sure to choose sensors that are compatible with your controller board. Most sensors use simple communication methods like I2C or SPI, which are easy to wire up.
Phase 3: Writing the Firmware and Software
Hardware is useless without instructions. Firmware is the special software that runs directly on your hardware board. It tells the board when to read sensor data and how to send it. Learning how to write this software is a key part of learning how to create an IoT device.
Selecting a Programming Language
For microcontrollers, C and C++ are the most common languages. They are very fast and work directly with the hardware. If you use an Arduino or ESP32, you will likely use the Arduino IDE, which uses C++. If you prefer a simpler language, you can use MicroPython. MicroPython lets you write clean, easy-to-read Python code on tiny microcontrollers. It is an amazing tool for beginners who want to get results fast.
Connecting to the Cloud
An IoT device is not truly “IoT” unless it connects to the internet. Your firmware needs to send data to a cloud platform. You can use simple protocols like MQTT or HTTP to send this data. Many developers love using dedicated IoT platforms like Adafruit IO, AWS IoT, or Blynk. These platforms give you ready-made dashboards to view your data on your phone or computer. If you want to see a step-by-step example of this integration, you can read about building an IoT device from scratch to understand how code links hardware to the web.
Phase 4: Prototyping and Assembly
Once you have your parts and code, it is time to build. Do not worry about making it look pretty yet. Your first goal is simply to make it work. Prototyping is all about testing your ideas quickly and making changes when things do not go as planned.
The Breadboard Stage
A breadboard is a plastic board with holes that lets you connect wires without soldering. This is where you should always start. Plug in your microcontroller, connect your sensors with jumper wires, and load your code. If a sensor does not work, you can easily unplug it and try a different pin. This stage is all about trial and error. Do not get discouraged if things do not work on the first try!
Designing a Custom PCB
Once your breadboard prototype works perfectly, you might want to make it permanent. Jumper wires can easily shake loose. To fix this, you can design a custom Printed Circuit Board (PCB). A PCB holds all your parts in place and connects them with permanent copper paths. You can use free design tools like EasyEDA or KiCad to draw your circuit. For a detailed walkthrough of this step, check out this handy step-by-step PCB assembly tutorial to guide your first hardware build.
Phase 5: Ensuring Security and Scalability
Security is often forgotten when people learn how to create an IoT device. However, a smart device connected to the internet can be a target for hackers. If you want your project to be safe, you must think about security from the very start.
Encryption and Authentication
Never send sensitive data over the internet in plain text. Always use secure connections like HTTPS or MQTTS, which use TLS encryption. This keeps your data safe from prying eyes. Also, make sure your device requires secure authentication to connect to your cloud server. Never hardcode sensitive passwords or API keys directly in your public code repositories.
Over-the-Air (OTA) Updates
What happens if you find a bug in your code after your device is sealed inside a plastic box? This is where Over-the-Air (OTA) updates come in. OTA updates allow your device to download and install new software over Wi-Fi. This is a vital feature for any device that you plan to place in a hard-to-reach spot or share with other people.
Conclusion
Learning how to create an IoT device is an incredibly rewarding journey. It blends the physical world of hardware with the digital world of software. While it might seem complex at first, breaking the process into smaller steps makes it highly achievable. Start small, build a simple prototype on a breadboard, and keep learning as you go. Before you know it, you will be designing custom smart gadgets that make your daily life easier and more connected. So, grab a microcontroller, write your first line of code, and start building today!
Frequently Asked Questions
Do I need to know how to code to create an IoT device?
While knowing how to code helps, you do not need to be an expert to get started. Many beginner-friendly platforms like Arduino and MicroPython offer simple code templates you can easily copy and modify. There are also visual block-coding tools available for absolute beginners.
What is the cheapest microcontroller for IoT projects?
The ESP32 is widely considered the best budget-friendly microcontroller for IoT. It costs only a few dollars and comes with built-in Wi-Fi and Bluetooth capabilities. This makes it much cheaper and more convenient than buying separate wireless modules.
How do IoT devices connect to the internet?
IoT devices usually connect to the internet using built-in Wi-Fi, Bluetooth, or cellular modules. For remote outdoor projects, developers often use low-power wide-area networks like LoRaWAN. The choice depends on your project’s power budget and location.
Can I use a Raspberry Pi to build an IoT device?
Yes, the Raspberry Pi is an excellent choice for complex IoT projects that require high processing power. It runs a full operating system, allowing you to run databases, local servers, and machine learning models. However, it uses much more power than a simple microcontroller board.
How do I power my DIY IoT device?
You can power your device using a standard USB wall adapter for indoor projects near an outlet. For portable or outdoor devices, rechargeable LiPo batteries or small solar panels are popular options. You will need to optimize your code to put the device into deep sleep mode to save energy.
Is my home IoT network safe from hackers?
Your DIY IoT device can be secure if you follow basic safety practices. Always encrypt your data using secure connection protocols like HTTPS or MQTTS. Avoid sharing your Wi-Fi credentials in public code repositories, and make sure your cloud server requires strong authentication.
